You should read this excellent book. Really, you should. Remember the film Independence Day. Giant, incredibly advanced alien ships have appeared above the major cities of Earth. They appeared swiftly. There was no warning. Nobody knows what to expect. The Earth is thrown into a state of alarm. From the heavens descends a single craft, landing on the White House lawn. Out steps the mysterious alien visitor, and demands the presence of the newly-elected American President. "Have I got a deal for you, Mr President!"
The aliens are selling advanced technology. But they are selling it, not giving it away. Why? For what price - now and later? To learn that you will need to read the very funny début novel of the awesome Bruno Lombardi, Snake Oil. It's available from Amazon here. it's available from Smashwords here.
He also has a short story out in this collection here: A Thursday Night at Doctor What’s Time
and Relative Dimensional Space Bar and Grill.
If you like the short story, you will love the novel. Bruno is an excellent writer and observer of the human condition. Check them both out, folks, because I promise you that you will laugh your socks off!
Wednesday 27 February 2013
Tuesday 26 February 2013
Hot mushroom & leek soup with tofu croutons
This blog is usually about making things. Today it's about making dinner. This one is very high in protein, something we vegans often get accused of forgetting about. It's also delicious, the refuting of which we battle almost daily to our immense amusement. (If we didn't like it, why the hell would we eat it?) ;)
Ingredients:
* 100g leek
* 250g mushrooms (I used 100g Forestiere, 100g large flat and 50 g Shiitake, but whatever you have is good)
* A chilli
* 2 cloves garlic
* 10ml Olive Oil
* Oil for deep-frying
* Tofu for the croutons (I used about half a packet of Cauldron tofu). I froze it beforehand, and then microwaved it, mopping up all the water that came out of it. It's tougher this way. Said half-packet is probably enough for two folk, really.
* Flour
* 250ml stock (I didn't make my own, sorry. I used a teaspoon of Vecon Concentrated Vegetable Stock and added that - as per the instructions on the container - to 250ml water)
* 50ml vegan single cream
* Lots of black pepper
First off, the ingredients above should be considered an advisory. I like thick soups. I like soups so thick they could be considered super-dense new elements unknown to science, but I will accept soups slightly less dense than your average pâté.
1) Get the tofu out of the freezer, use the tap to wash off the external ice, then pop it on a plate and begin microwaving it. Have several (paper) towels ready to mop up the surplus water.
2) Chop your leek, mushrooms and chilli. Begin to fry them. Do not add the garlic unless you prefer it cooked to raw. Intermittently stir the vegetables while performing the next few activities.
3) While the vegetables cook, press the water out of the tofu. Be aware that hot water is hot. You aren't a customer at McDonald's. Pop some flour in a bowl, cut the tofu into chunks, and ensure that each side is covered in tofu.
4) Add some oil to another saucepan, and add the floured tofu chunks. Deep fry them. Once they are crisply golden brown all over, pluck them out with a fork and spoon, and deposit them on a piece of (paper) towel, which will absorb the excess fat.
5) While they deep fry, add the stock to the vegetables, and let it bubble away on a high or low heat (depending how thick you want the soup to be). If you want the soup to be thinner, use more water, of course.
6) Pop the 50ml of soya cream into a jug. Crush and chop the garlic, and add it to the same. If you dislike garlic, you will already have cooked it. Remove a couple of slices of mushrooms from the vegetable mix and set them aside. Add the reduced vegetables and stock to the garlic and soya cream, and with a food-processor whizz them together. Add black pepper as desired. I like things fairly spicy, so I used forty twists of the pepper-grinder.
7) Pop the tofu croutons in a bowl, and pour the soup over them. Add the slices of mushrooms previously set aside as a decoration, and serve.
8) Devour rapaciously.
Here's a photo with flash and another without. I suppose chicken might be a good stand-in for the tofu for anyone wholly opposed to its use. I hear it's not so flavoursome. After half a lifetime, you do forget these things. Sorry. Imperial Guardsmen are for scale purposes only. :D


Monday 25 February 2013
Terrain Tutorial: The Blasted Grove
Good morning, folks. Today I've got an idea which is nice and simple, and gives you a load of easy to make and easy on the eye terrain for very little outlay. Usually, wargames tables feature trees in full bloom, but some of the most striking photographs of the Great War are of trees blasted by artillery until they have lost every branch and scrap of leaf. Fortunately, it's the perfect time of year to recreate that look in scale.
Desiderata:
* Hot glue gun and sticks
*A base (I've used a spare bit of plywood here)
* Sand
* PVA glue
* Paint and brushes
* Some twigs from the garden
1) Make sure the twigs are dry, and aren't filled with wee creepy crawlies. This is both for their sake and yours. Do you want to explain that the house is suddenly full of woodlice because you brought in a load of wood? Didn't think so!
2) Sort the twigs so you have ones that look right, and put a few on each base. Don't overcrowd a base or you won't be able to move your infantry through it. Grab the hot glue gun and stick the twigs to the base.
3) Paint slightly diluted PVA over the base, and cover it with sand. Once this has dried apply another coat of diluted PVA to seal in the sand. See Fig. 1.
4) Wait for the second coat of PVA to dry, then paint it. If you want, you could add some dead leaves, bits of grass, skulls or other detritus, but you can quite easily just paint the model as totally blasted and lifeless. See Figs. 2, 3 & 4.
There you go, folks. Nice and simple. You can get a very evocative forest in this way in absolutely no time at all. Until next time, happy gaming!


Saturday 23 February 2013
The Risible Problems of the Vegan Wargamer
First, I'd very much like to thank the estimable dwez, who mentioned my blog on his the other day. It led to a surge of traffic the likes of which I haven't before seen! Thankee, dwez! Second, I'll move to the titular problems. They might well be risible from your point of view, but not from mine! Earlier today I perambulated through town, and into a national chain, which will be unknown, I imagine, to my extra-territorial readership, W. H. Smith's. I fancied buying some synthetic bristles. Now, you fancy folks with your awareness of the highest standards of wargaming painting will know that sable is the very thing to buy. You are the Duchess of Cambridge to my Katie Price, because I'm not buying a darned thing that's been plucked out of an animal.
I was a-listening to Radio 2 earlier today, and Jeremy Vine was chatting to a couple of folk who had recently become vegetarian as a result of the recent exposure of the UK's Food Standards Agency's inability to inspect the standards of food (for anyone abroad the shot story is this: there is horse in the meat Britons eat, and this upsets them). They were remarking on a dread horror of burgers, whereas what alarms me right now is plywood. No, you did read that right. About a week ago I read on t'interweb that plywood (of all things!) might be inimical to me (not to mention the poor wee sods it is made out of!), so I mean to avoid it. I inherited my Dad's desk. He isn't dead, mind, and I am shorter than he, so I rest a "sub-desk" on the main-drawer. Dad's got a new desk downstairs, you nervy types! I had been resting a plywood piece there, but now I find myself resting a solidish lump of plasticard there (3 layers of 2mm plasticard).
In a word, I have knocked up a monstrosity from plasticard because the plywood is too horrifying to retain. Meanwhile, the substance which appals will be the base material for a few approaching projects - none of which will remain near me!
Thursday 21 February 2013
Hulk Smash!
As I resolved at the beginning of the year, I have been working out more. I have been trying not to let this get in the way of the blog, but it has rather delayed yesterday's entry. So this is just to let you folks know that there'll be yet another terrain tutorial along shortly. I am pretty cheered by how well the exercise is going, though yesterday morning I over-exerted myself, and spent the afternoon lounging about. It is mainly weight-lifting I have been concentrating on, and I can report substantial increases in the abilities of every groups of muscles I have been training thus far. For reference, I think that's all of them! I have been most pleased by the improvement in my deadlifting. For years I had been stuck at about 70kg (c.154lbs). My back wasn't greatly impressed, but my forearms simply weren't able to do more. In these last few weeks, however, I have been following the advice in Arnie's mammoth New Encyclopaedia of Modern Bodybuilding, and specifically training the forearms. The result is that I am now managing deadlifts of 110.1kg (c.243lbs) in 3 sets of 10, then 6, then 4 reps. Two friends with more experience have recommended straps, but I have yet to get my head around them.
I shan't bore you with the remaining details (for now), but rest assured that since tomorrow is a rest day (I'm working out 3 days, and taking one off), I should be able to get some essential 'gaming-based work done. Right now, though, I'm going to do some leg exercises. Until next time, happy gaming, folks!
I shan't bore you with the remaining details (for now), but rest assured that since tomorrow is a rest day (I'm working out 3 days, and taking one off), I should be able to get some essential 'gaming-based work done. Right now, though, I'm going to do some leg exercises. Until next time, happy gaming, folks!
Monday 18 February 2013
Terrain Tutorial: Stone Watchtower
I promised something more interesting last time, and I deliver! This is also more complicated, but only very slightly.
Desiderata:
* Hot glue gun and glue sticks
* Staples
* Basing material (I'm using a CD)
* Sand
* Cardboard (cereal packet is fine)
* Superglue
* PVA glue
* Paint and brushes
* Foamcard
* Sharp knife
* Balsa wood
* Cardboard
* Plasticard which resembles dressed stonework (I got mine from the 4D Modelshop, and it's 1:43 scale)
* Plasticard tube
* Milliput or GS
* Ruler
* Pencil
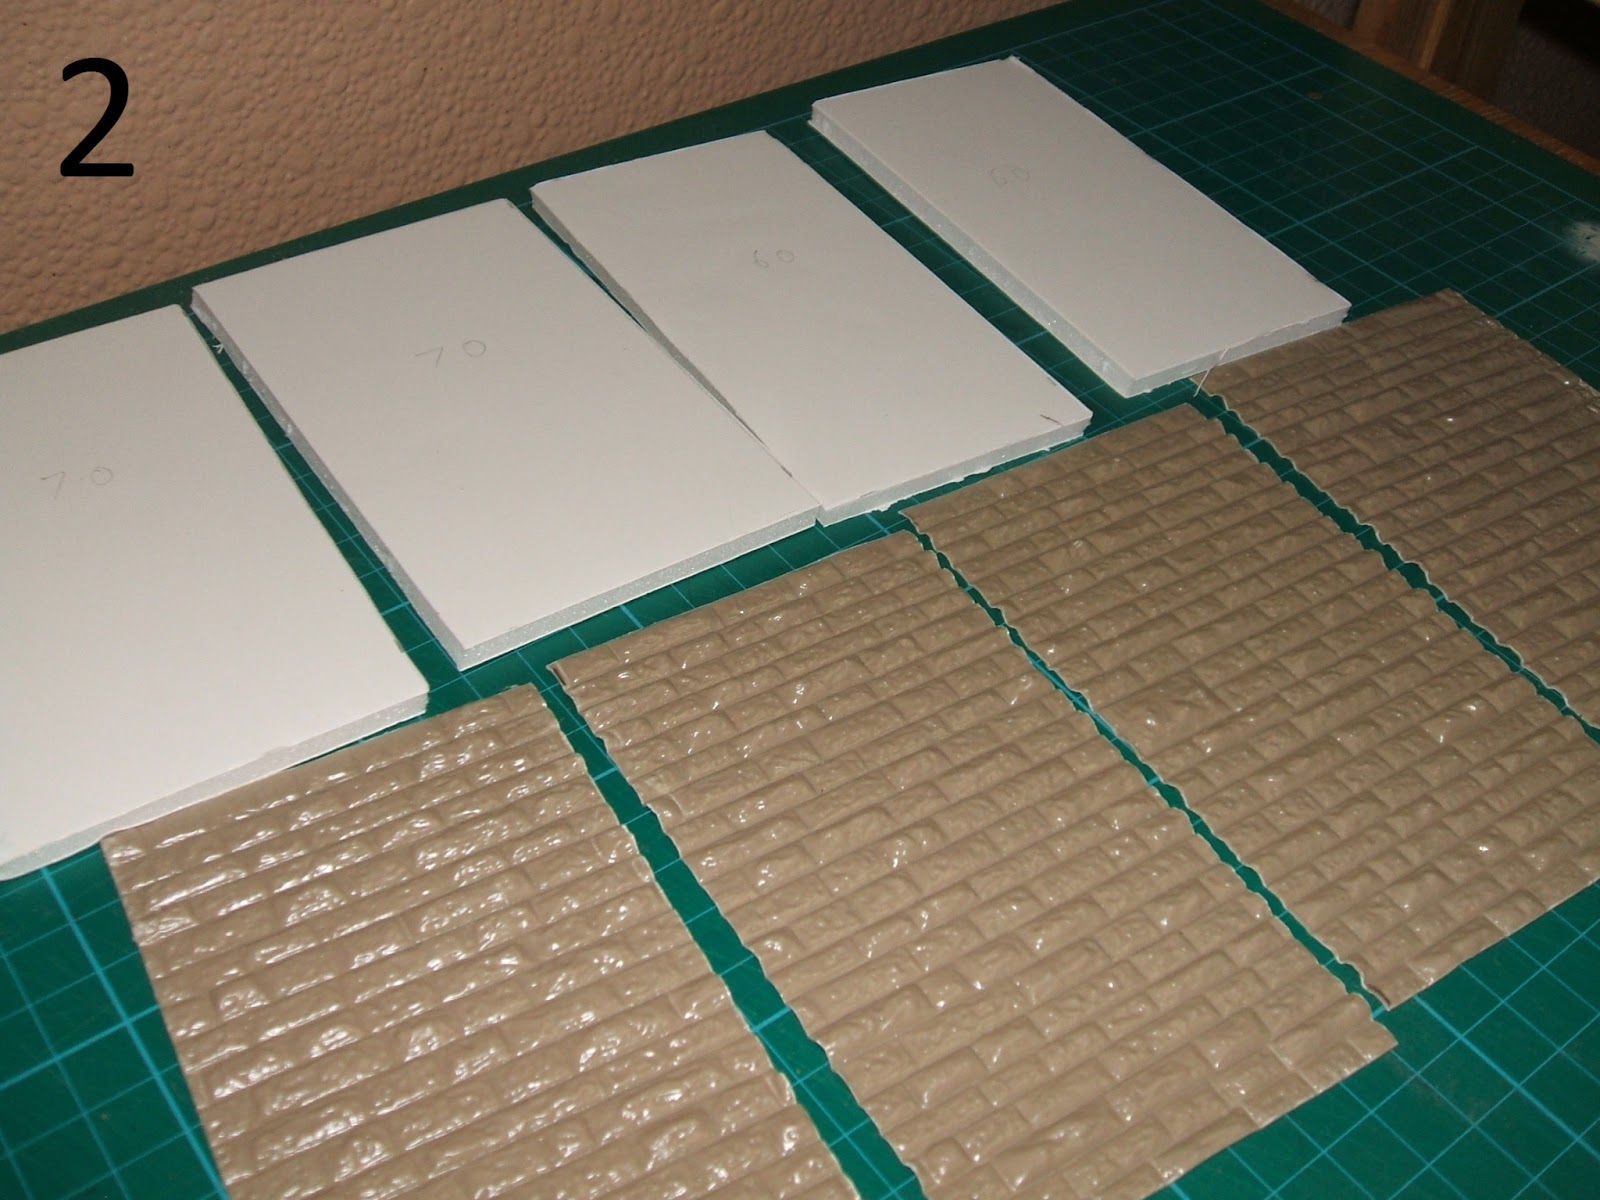
1) Grab all your equipment, and then decide just how big you want your tower to be. There are two factors to consider here. First, how much "dressed stone" plasticard do you have, and, second, how large is your basing area. I cut four pieces of foamcard, two were 70mm by c. 125mm and the other two were 60mm by c. 125mm. I say c.125mm, as I actually chose the height of the buildings so that the dressed stone was in complete rows from top to bottom. The 60mm bits are shorter as the foamcard is 5mm thick. See Figs. 1&2.
2) In the foamcard cut small arrow slits on the upper floors, and a large doorway on one side of the ground floor. Use the hot glue gun to secure the foamcard pieces to the base and to one another, then glue the dressed stone plasticard over the sides. Use your knife and carefully ensure that the windows and door are not blocked off by the plasticard! Do not worry that there are gaps at the corners of the building and elsewhere. See Figs. 3&4.
3) Take your balsa, and cut it into pieces slightly larger than the windows and doors. With a pencil and ruler, scribe the balsa so it seems that it is divided into planks of wood. Then glue these in place with the hot glue gun. See Fig. 5.
4) Mix your Milliput or GS, and fill in the various gaps around the model, not just the corners, but also the windows and the tops of the walls. If you have modelling tools, you can use these, but do not feel you need them desperately for this. After all, you are just trying to make it appear to be dressed stone, so a thumbnail or spare bit of wood will do perfectly well. See Fig. 6.
5) Cut yourself a roof from some foamcard. Take some offcuts and glue them in the internal corners to support this piece of plasticard. Then glue it in place with the hot glue gun, too. Take a piece of balsa, and scribe it as before, and glue it in place as a trapdoor. Take some pieces of the dressed stone, and use them to create an apparent floor. See Fig. 7. If you have some spare "dressed stone" plasticard, you could make a three-level tower: The lower level with the door, the second level with the arrow slits, and a roof level. I wanted to save some pieces of "stone" for a future tutorial, so I didn't.
6) I wanted to detail the door and the trapdoor on the roof a bit. So I cut some thin strips of cardboard, making them pointed at one end, and superglued them onto the door and trapdoor. I cut some tiny squares of cardboard, and superglued them on as large rivets. The handle was a bit trickier. I cut a square of cardboard, and a thin ring off the end of a plasticard tube. I glued the ring to the square, and the square to the door. I took a staple and bent it in two, twisting it around some pliers so it formed an elongated U-shape. I pushed a pin through the square of cardboard, and then pushed the staple through, too, securing it with some superglue. It now appeared that the door had a handle held in place by another piece of metal. Apply PVA to the base, tip sand over it, and then apply another layer of dilute PVA to lock it in place. See Figs. 7&8.
7) Give the model a once-over at this point, and once you're sure everything is fine, and the PVA dry, undercoat the model. Then go wild with the paints, and Bob's your uncle! See Figs. 9, 10&11.
I hope you found that handy, folks! I shall try to put up a few variations on this theme in the next fortnight or so. Happy gaming until next time!


Desiderata:
* Hot glue gun and glue sticks
* Staples
* Basing material (I'm using a CD)
* Sand
* Cardboard (cereal packet is fine)
* Superglue
* PVA glue
* Paint and brushes
* Foamcard
* Sharp knife
* Balsa wood
* Cardboard
* Plasticard which resembles dressed stonework (I got mine from the 4D Modelshop, and it's 1:43 scale)
* Plasticard tube
* Milliput or GS
* Ruler
* Pencil
1) Grab all your equipment, and then decide just how big you want your tower to be. There are two factors to consider here. First, how much "dressed stone" plasticard do you have, and, second, how large is your basing area. I cut four pieces of foamcard, two were 70mm by c. 125mm and the other two were 60mm by c. 125mm. I say c.125mm, as I actually chose the height of the buildings so that the dressed stone was in complete rows from top to bottom. The 60mm bits are shorter as the foamcard is 5mm thick. See Figs. 1&2.
2) In the foamcard cut small arrow slits on the upper floors, and a large doorway on one side of the ground floor. Use the hot glue gun to secure the foamcard pieces to the base and to one another, then glue the dressed stone plasticard over the sides. Use your knife and carefully ensure that the windows and door are not blocked off by the plasticard! Do not worry that there are gaps at the corners of the building and elsewhere. See Figs. 3&4.
3) Take your balsa, and cut it into pieces slightly larger than the windows and doors. With a pencil and ruler, scribe the balsa so it seems that it is divided into planks of wood. Then glue these in place with the hot glue gun. See Fig. 5.
4) Mix your Milliput or GS, and fill in the various gaps around the model, not just the corners, but also the windows and the tops of the walls. If you have modelling tools, you can use these, but do not feel you need them desperately for this. After all, you are just trying to make it appear to be dressed stone, so a thumbnail or spare bit of wood will do perfectly well. See Fig. 6.
5) Cut yourself a roof from some foamcard. Take some offcuts and glue them in the internal corners to support this piece of plasticard. Then glue it in place with the hot glue gun, too. Take a piece of balsa, and scribe it as before, and glue it in place as a trapdoor. Take some pieces of the dressed stone, and use them to create an apparent floor. See Fig. 7. If you have some spare "dressed stone" plasticard, you could make a three-level tower: The lower level with the door, the second level with the arrow slits, and a roof level. I wanted to save some pieces of "stone" for a future tutorial, so I didn't.
6) I wanted to detail the door and the trapdoor on the roof a bit. So I cut some thin strips of cardboard, making them pointed at one end, and superglued them onto the door and trapdoor. I cut some tiny squares of cardboard, and superglued them on as large rivets. The handle was a bit trickier. I cut a square of cardboard, and a thin ring off the end of a plasticard tube. I glued the ring to the square, and the square to the door. I took a staple and bent it in two, twisting it around some pliers so it formed an elongated U-shape. I pushed a pin through the square of cardboard, and then pushed the staple through, too, securing it with some superglue. It now appeared that the door had a handle held in place by another piece of metal. Apply PVA to the base, tip sand over it, and then apply another layer of dilute PVA to lock it in place. See Figs. 7&8.
7) Give the model a once-over at this point, and once you're sure everything is fine, and the PVA dry, undercoat the model. Then go wild with the paints, and Bob's your uncle! See Figs. 9, 10&11.
I hope you found that handy, folks! I shall try to put up a few variations on this theme in the next fortnight or so. Happy gaming until next time!


Friday 15 February 2013
Terrain Tutorial: Defensive Earthworks
A happy post-Valentine's Day to all you folks. I hope you all had a lovely day! Right, now on to today's terrain tutorial. This draws on a previous tutorial, in which I described how to make an individual defensive earthwork for a single Heavy Weapons Team. Now, how could that be improved upon? Well, the Aegis Defence Line exists, and that is pretty much composed of straight lines, so with that in mind, here is something you can use to defend a squad of troops or a Heavy Weapons Team.
Desiderata:
* Hot glue gun and glue sticks
* A hunk of polystyrene
* Some basing material (I used a 6" by 2" piece of 2mm thick plasticard)
* PVA glue
* Sand
* Matchsticks
* A sharp knife
* Paint and brushes
1) Cut your basing material to size. I cut mine to a 6" (150mm) by 2" (50mm) rectangle. It's tempting to make it shallower (e.g. 6" by 1.5"), but do note that the shallower you make it, the harder it becomes to model a convincing slope. Grab yourself a hunk of polystyrene big enough to more than cover the base, and you are ready to go. See Fig. 1.
2) Grab the hot glue gun and stick the polystyrene to the base. Leave a thin strip of plasticard showing on one long side. Here is where you will glue in some matchsticks to give the impression that something is holding up the rampart. See Fig. 2.
3) Trim the polystyrene with your knife, and try to approximate a slope. Take one of your models, and make sure that it can see over the top of the ramparts, or, if it's a kneeling HW Team, ensure the gun can poke over the top. See Fig. 3.
4) Trim some matchsticks to the right size, and glue them in place with the hot glue gun. See Fig. 4.
5) Apply dilute PVA glue over the model except for the matchsticks, and tip sand over this. Once dry, apply another coat of dilute PVA, and let it dry.
6) Undercoat your model and paint as desired. See Figs. 5&6.
Note that you do not have to stick with a straight line if you dislike it. I have also modelled a curved defensive earthwork. Do note that this does not have the same dimensions as the straight example. See Figs. 7&8.
Next time I'll be tackling something a bit trickier. Happy gaming, folks.


Wednesday 13 February 2013
Terrain Compendium: Hold until relieved!
I have recently posted quite a few tutorials, which have mainly covered how to build pretty simple defensive structures. It strikes me that the best thing to do when so many articles have been posted is to collect them all in one handy location. Today's post is a compendium of these recent terrain tutorials. This is a one-stop-shop of bunkers and ramparts, folks! If you want to avoid being overrun, leaf through the following.
First up is a pair of ways to build miniature bunkers. These are adorable little things which fit on a CD and will hold either a single Imperial Guard Heavy Weapon Team or 5 or 6 individual models. The first is for those of you with a few lumps of spare plasticard about, and the second is for you folks with foamcard in abundance. Actually, even foamcard in short supply will do. These bunkers really are tiny!
If you fancy a larger bunker, one capable of containing a whole squad of Guardsmen (or even a whole Heavy Weapons Squad), then this is the tutorial for you. For variations on that theme, check out this entry, which offers some alternative (or alternate, if you're an American reader) configurations which might offer you some advantages in battle.
At the lower end of the technology scale, check out this design for earthworks. It's a design which you can easily scale up to protect a larger unit, or just provides a nice, simple defensive structure for a single HW Team or 5-6 infantry models. Then there's this really simple obstruction-cum-defensive structure: the wooden fence. Hide behind it. Retard or channel the advance of enemy infantry. The options are endle- well, pretty limited, actually. But it's great for those pre-industrial games, and you modern era guys will love running a tank over it and demanding it be removed from the board. If there's one thing PC games have taught us it is that everybody loves deformable terrain!
If you'd like to hold up enem vehicles with a spot of difficult terrain, then check out these tank traps. Alternatively, try out this really, really simple version of tank obstacles.
Here are a few bonus pictures of things I have been working on. I mentioned above the mini-bunkers. I completed most of these to hold HW Teams in comfort, but who doesn't want a ruin? They're handy to represent the building the enemy shot up last turn, an abandoned construction, or just a bit of incomplete or substandard workmanship. Er, on the part of the army's engineers. I always meant it to look that way. I didn't just lazily give up halfway through. Ahem!


Monday 11 February 2013
Terrain Tutorial: Tank Obstacles the easy way
Last time I covered tank traps, large metal constructions made of girders. This time I offer the simpler way to stop tanks. In fact, this is so simple it barely needs an article! All you need for this is -
* Sand
* PVA glue
* Base (as usual I'm using a CD)
* Cardboard (to cover the central hole in the CD)
* Superglue
* Hot glue gun and sticks
* Paint
* A spare lump of polystyrene
1) Grab your spare bit of polystyrene and cut some similarly shaped squares out of it. Carve these so they look like pyramids with the ops sliced off. They don't have to be very tall You probably won't need more than an inch (25mm) in height at the most. See Fig 1.
2) Superglue some cardboard to cover the hole in the CD. Then use the hot glue gun to secure the pyramidal lumps to the base. Spread them out a bit so infantry can still get through, but bikers and tanks will have trouble. See Fig .2.
3) Apply a layer of diluted PVA to everything, and tip sand over it all. Wait for it to dry, then apply another coat of diluted PVA, and let that dry.
4) Undercoat everything and set to work painting. Drybrush the pyramidal lumps with successively lighter greys, then drybrush the ground in dirt tones until you're happy. See Fig. 3. You can add bits of model grass to add colour, or spare things from your bits box to tie them to a particular army. I have deliberately left these very generic.
Happy gaming, folks!


Friday 8 February 2013
Terrain Tutorial: Tank Traps
When I was a little boy, I used to love to sit and stare at old war films on the television. One of my favourite was The Longest Day, which depicts the successful (thank Heaven!) Allied invasion of Normandy in WWII. The beach assault scenes are particularly striking. The German defenders have deployed thousands of obstacles to prevent Allied tanks from landing and moving inland. There is a very simple way of making these: get some H-Beam or I-Beam plasticard pieces, chop them up and stick them together. However, I had none to hand. So instead I took some 0.5mm plasticard and some 2mm plasticard and set out to make some simple girders.
1) Take some 2mm-thick plasticard, and cut strips that are 5mm by 50mm. You will need three for each obstacle you mean to make.
2) Take some 0.5mm-thick plasticard and cut some strips that are the same dimensions. You will need twice as many of these as of the 2mm-thick pieces.
3) Glue one of the narrow long edges of the 2mm-thick plasticard to the middle of a thinner strip, creating a very long T-shape. See Fig. 1. Leave to dry.
4) Glue another thin piece of plasticard to the other side of the 2mm-thick strip, creating your girder. Repeat until you have three girders for each tank trap you mean to make. See Fig. 2.
5) You are now going to glue the girders together, which is made a lot easier by having more surface area. Glue a few small offcuts of plasticard in the middle of two girders, see Fig. 2 again. Then glue them together at this point, so they form a cross. See Fig. 2 yet again. Leave to dry.
6) Take the third girder and glue this between the two girders, see Fig. 3. Leave it to dry, or hold it to dry if you cannot get it to sit still happily. Once this has dried you will have what is effectively a tripod.
7) At this point you can either paint the finished tank obstacle or you can base it. If you do, I offer again the option of basing a pair of them on an unwanted CD. If you place them right, you should be able to fit a HW Team in the empty space of the CD. See Fig. 4.
8) If you decide to base them, superglue a bit of card on the CD to cover the central hole. Use a hot glue gun to secure the tank traps to the base, then apply a coat of dilute PVA and tip sand over the top. Once this has dried apply another coat of dilute PVA, wait for that to dry and then set to painting.
9) I undercoated everything black, and then painted the tank traps with an obsolete GW Foundation Paint, and drybrushed them with the remnants of a pot of Boltgun Metal, then splodged on a few bits of Mithril Silver. You can apply some more washes and inks at this point if you like. Then I painted the ground in my preferred colours. See Figs. 5, 6 & 7.
As usual, apologies for Blogger's reordering of my photographs. They are numbered so you can see what I mean despite the blog's attempt to sabotage me! Happy gaming, folks!


Wednesday 6 February 2013
Terrain Tutorial: Simpler Mini Bunkers for 40K
Some time ago I offered up a tutorial on mini bunkers which can enclose a single HW Team. I noticed two things about them that could be improved on. First, they relied on a store of plasticard, and on laminating it. So this has been replaced with foamcard, which is easier to cut to shape. Second, they were designed only with Imperial Guard models in mind. I realised that just adding a little height would allow them to be used for taller miniatures, such as Space Marines toting Missile Launchers, opening up a wider vista of opportunities for these little fellas. So now they are more versatile! Ever the recycler, I have re-used some pictures and text from the earlier tutorial. Here's how you make the simpler bunkers.
* Plasticard sheet (0.5mm thickness)
* Plasticard rod (of whichever size you feel best suits buttons, rivets and door-hinges)
* Polystyrene cement
* Cardboard
* Foamcard (5mm thickness)
* Green Stuff or Milliput
* Superglue
* Sand
* Paint
* PVA glue
* Spare CDs or other things to use as bases
* Hot glue gun and sticks
* Ruler
* Pencil
* Knife
1) Grab yourself a bit of cardboard. A cereal box would be fine. Mark yourself a square with sides of 3" (75mm), and cut it out. Find the midpoint of each side, mark half an inch (12.5mm) either side of this, so that there is an inch (25mm) marked in the middle of each side. Trace lines between these so as to create a slightly irregular octagon. Cut along these lines to create such an octagon. Using superglue, secure this template to the centre of your CD, remembering not to put glue where the hole will be, accidentally gluing it to your work surface! For a plan see Fig. 1, and see Fig. 2 for the cardboard glued in place.
2) Cut a strip of foamcard that is 45mm across. If you want a taller bunker, just increase this measurement. Cut three 25mm strips. See Fig. 3.
3) Using the hot glue gun, glue the three strips to the perimeter of your card template and try to ensure they set in a vertical position. Then trim some more pieces of the foamcard to slightly longer than the gaps between them, and dry-fit them in place. Trim them to size with your knife, and then use the hot glue gun to secure them. For the front of the bunker, do not add the very front wall until last. First make your rough cuts of the front left and front right sides. You should have an angular C-shape and reversed shape. The bottom of the C should be 14mm, the top and side 10mm. Glue them in place with the hot glue gun. See Fig. 4.
4) Cut a couple of pieces of foamcard to fill the gaps in the front of the building, and with the hot glue gun, secure them in place. See Fig. 5. Now trim down the odd protrusions and smooth out the sides of the bunker as much as you can with your knife. Cutting a lot of foamcore may blunt it, so do change the blade if you need to. Now you can, if you, like, add a layer of 0.5mm-thick plasticard around the outside (and inside) of the bunker, and fill in any empty spots with GS or Milliput. I only had GS at the time. See Fig. 6.
5) Now use a bit of plasticard and knock up a door for the back of the bunker. Apply rivets and a handle or control panel and superglue it in place. See Fig. 7. You can compare the two different designs of bunker in Fig 8. The walls of this newer bunker are a bit thicker, as you can see. Turn the bunker upside down on a sheet of foamcard, and trace around itsedges. Carefully cut this shape out of the foamcard, trim it a little, and you should have a perfectly fitting roof.
6) Now grab a load of sand and some slightly diluted PVA glue. Apply the PVA liberally to the bunker, and to the roof, and apply sand atop this. Remember to scrape off any sand that gunks up the door. Wait for this to dry, then apply a coat of dilute PVA over the top of it for it to dry. Then undercoat as you wish, and set to painting. See Figs. 9 & 10.
Some of the pictures below are out of numerical order. Blogger seems to enjoy doing this. Attempts to move them always result in a mess. They are labelled with the correct numbers, so you shan't get too lost! Happy gaming, folks!


Monday 4 February 2013
Terrain Feature: Bunker Variations
Hey up, folks. The other day I promised you some variations on the "bunker fit for a squad". There are three varieties of bunker here. All of them share a common feature: I trimmed off the top of the plastic tub, which is a thin lip that rests on the gaming table otherwise. The first of these is a modification of the original Squad Bunker. As I mentioned in that tutorial, you might get opponents raising eyebrows about LOS from any HW Teams in the building, as the guns cannot poke out the openings. This version of the bunker solves that problem, not having vision slits so much as gaping holes out of which regular infantry models and HW Teams can both draw LOS to models outside. As well as this, I have painted this model so it seems to fit a "Red Planet" theme. Anyway, see Fig. 1-3.
The second and third versions are both designed with HW Squads in mind. For both of these the foamcard is glued on externally, leaving enough space within for three HW Team bases. If the foamcard were applied internally, there just would not be enough room. Anyway, one is modelled to allow the HW Squad to have one gun of the Heavy Weapon Squad pointing out to cover most of the approaches to the bunker See Figs. 4 & 5. To be honest, I am not sure how LOS works in the current incarnation of 40K, so this might not be that helpful. But if that is so, then the third iteration is the one you want. I have carved out the front of the bunker, creating a "vision slit" which gives the three HW bases excellent forward LOS and pretty good side ones, too. If you have enemy coming at you from the font and simultaneously sweeping around your sides, this is the version you want to give your HW Squad the best protection while allowing the best field of fire. See Figs 6-9.
Stay tuned for more terrain updates, folks!


Subscribe to:
Posts (Atom)